- Home
- / Blog
- / Art History
Five Easy Light Painting Techniques You Need to Try
03/07/2021

Light painting in photography is the perfect marriage between traditional art and digital photography. In light painting, the photographer uses a combination of ambient and intentional light to produce an illustration effect within the photo.
The light painting effect is achieved during the shooting stage, rather than in post-production. Light painting is a dynamic technique, with endless possibilities for creative expression in photography. It's easy to do, needs minimal equipment, and allows you to stretch the boundaries of art and photography simultaneously.
How Does Light Painting in Photography Work?
To understand light painting in photography, it is first necessary to understand how photographs are formed through exposure. There are two key elements in exposure:
Shutter Speed
Your shutter speed refers to how long the sensors in your camera are exposed to the light for. Most images only need light for a fraction of a second to expose, such as 1/500 or 1/30, but some images need a long exposure that can take seconds, minutes, or even hours to produce a clear image.
Aperture
The aperture refers to the size of the hole the light passes through to reach the sensors or film in your camera. Larger apertures, such as f2.8 or f5.6 allow more light to pass into the camera, whereas smaller apertures, such as f16 or f22, cause the light to trickle into the camera slowly.
Exposure is the combination of your shutter speed and aperture settings on your camera. It follows a simple formula:
Amount of light received x Length of time received for = Total exposure to light
The bigger the aperture, or the slower the shutter speed, the longer or greater the exposure, and the brighter the image. In light painting, we work with long exposures in low light conditions, which gives the photographer time to manipulate light to achieve a hand-drawn effect.
This is also represented in the history of light and shadow in films of German expressionists.
Ambient Light is the Background in Light Painting Photography
In light painting, low light conditions expose the image very slowly over a long period of time. As the image forms in your camera, the brighter elements will become more saturated than those areas of the image that have less light.
We often see this in sunsets, and astronomy. In photography, the longer exposure means ambient light has time to reveal hidden hues, which are often purple or blue. The overall effect is captivating.
In the below image, the photographer has used a long exposure to create a sense of mist on the water. She has added interest into the foreground rocks using a flash light to light these separately to the sunset.
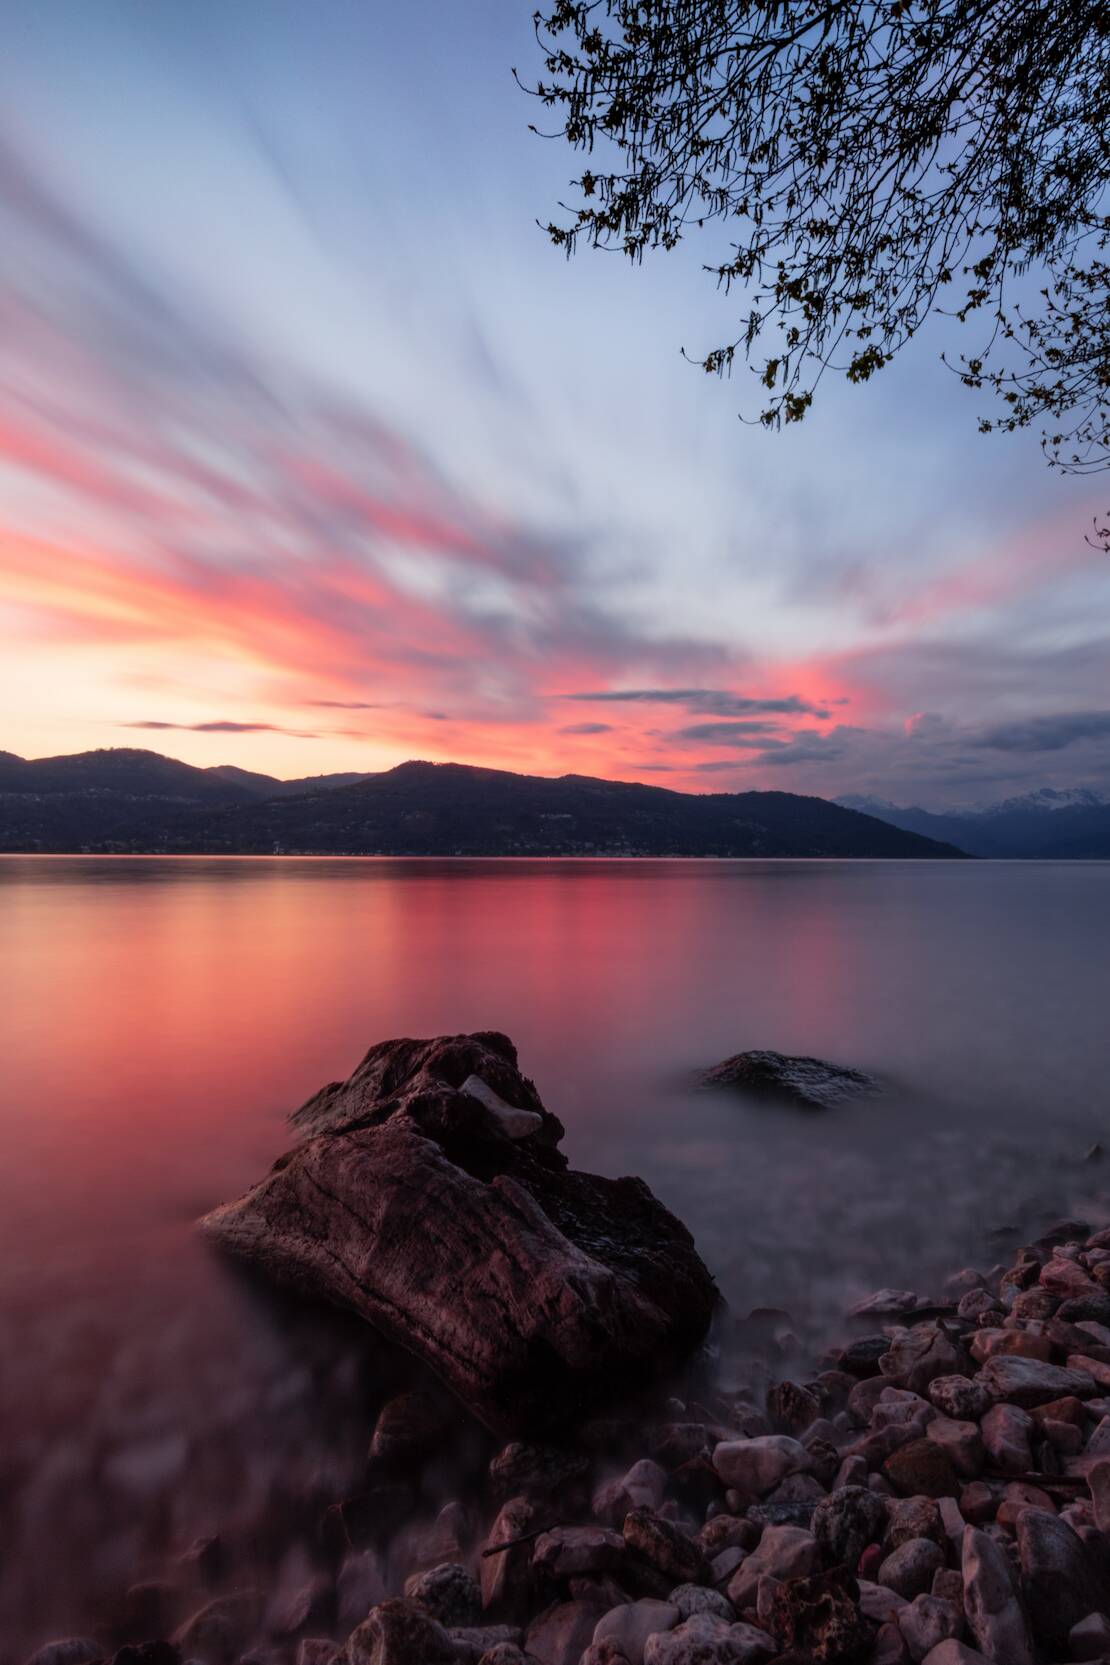
When light painting, look for dark ambient light with hidden details and colors. These will add interest to your background over a long exposure, and give you plenty of time to draw freely with additional light in the foreground.
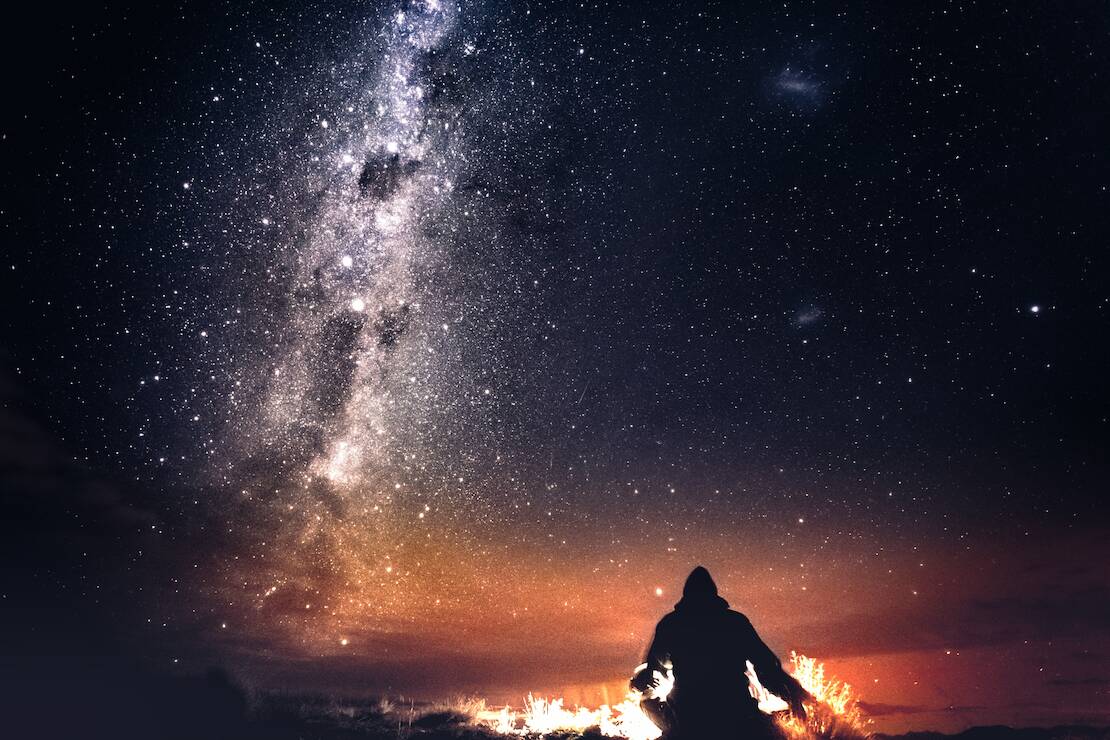
Artificial Light is the Foreground in Light Painting Photography
Light painting overlays areas of bright light into a dark image to add an illustration to the foreground, or to pick out details in objects that would otherwise remain unseen. The brighter lights in the foreground need far less exposure time than your dark background, which is often a matter of trial and error.
This process of experimentation activates your creative juices, allows the art to unfold in an unstructured way, and gives light painting in photography an organic look and feel that can't easily be replicated in post-production.
It's very easy to do. You will need
- An SLR camera with manual exposure capabilities.
- A tripod, or a small wheat bag to steady your camera.
- Flashlights of various sizes.
- A remote control or shutter release cable.
- A flask of hot cocoa if the weather is cold.
Step 1: Choose a background scene during the day, which will be photographed at night when it's dark.
Step 2: Decide what you would like to place in the foreground, and choose a strong composition for your story board.
Step 3: Revisit your scene 30 minutes before dark, which will give you time to set up your equipment.
Step 4: Place your camera on a tripod, and set your camera's shutter speed to the bulb setting. The bulb setting allows you to manually open and close the shutter yourself using your shutter release cable, so you can have indefinitely long exposures. If you don't have a bulb setting on your camera, set your shutter speed to the longest possible shutter speed.
Step 5: Start shooting as soon as the ambient light reaches twilight, which is usually around 15 minutes before total darkness.
Step 6: Open your shutter, and add your highlight elements for a few seconds at a time to create your foreground.
Step 7: Play! The more you do, the more creative you will become, so don't be afraid to spend a few hours with your camera to experiment with the 5 easy light painting techniques below.
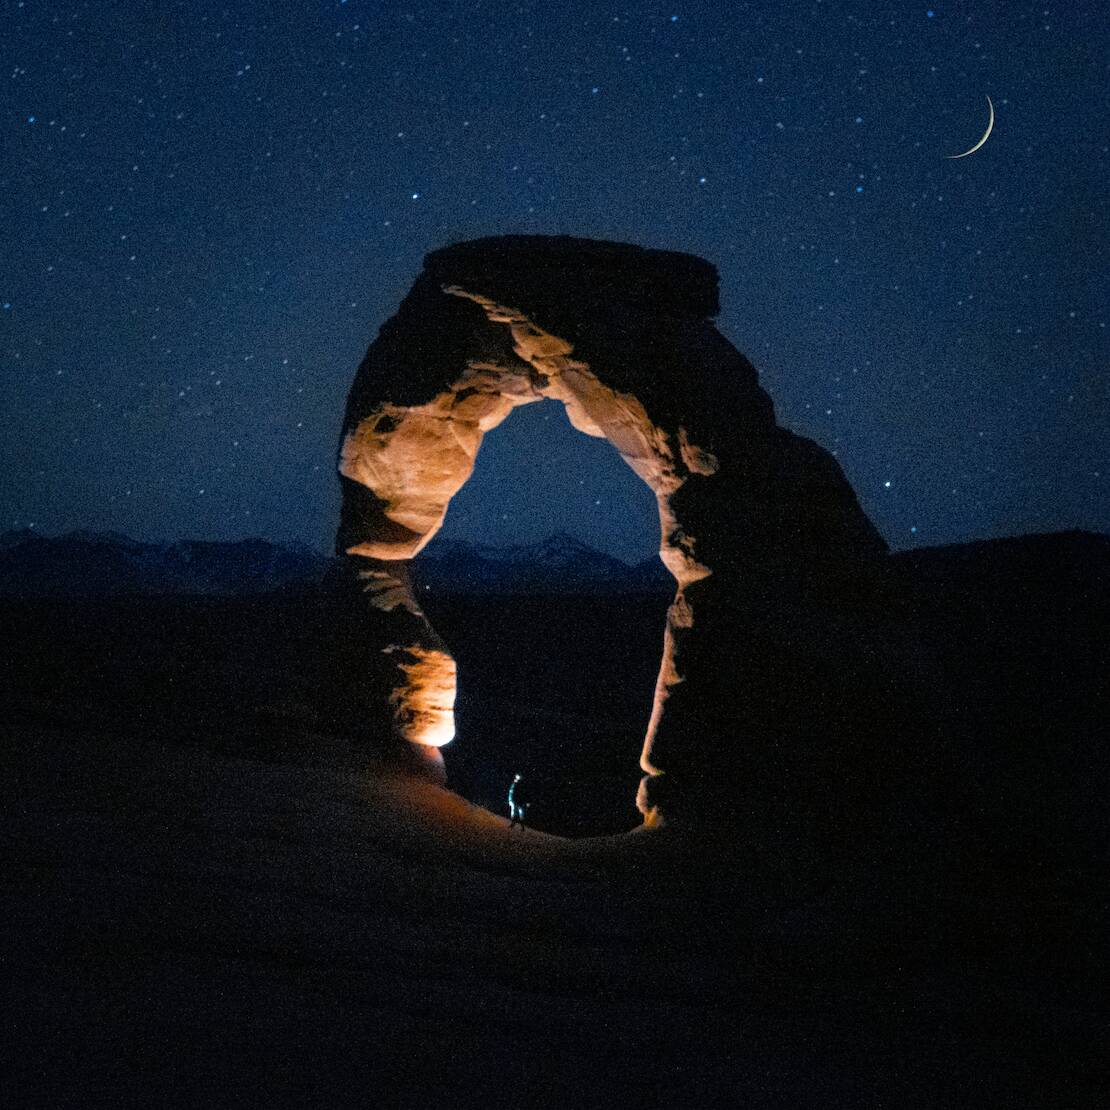
1. Light Painting Textures with Flash Lights in Photography
Flash lights in light painting are used to pull the details into the foreground. Flashlights can be as simple as the flashlight on your phone, or the high-powered flash lights used for security. Try to have a variety of sizes and strengths on hand.
The temperature of the flash light bulbs will also make a difference to your image. Some flash lights have tungsten bulbs, which will warm your photo and produce a yellow or orange filter in you light painting. Other flash lights are LED lights, which are bright white in light paintings. You can choose any type or color that suits, and variety is always best.
Flash lights can be used to create texture.
To get the best effect, place your flash light close to the object's surface. Move the flash light from side to side in fluid, sweeping motions to highlight the texture on the surface.
Objects that are close to the camera, such as a tree or fence, work best with a small to medium-sized flash light, while objects that are bigger or further away, such as a field or jetty, need a large and powerful flash light.
Be careful not to shine the flash light directly at the camera while you are painting with light, as this will show up in your photo!
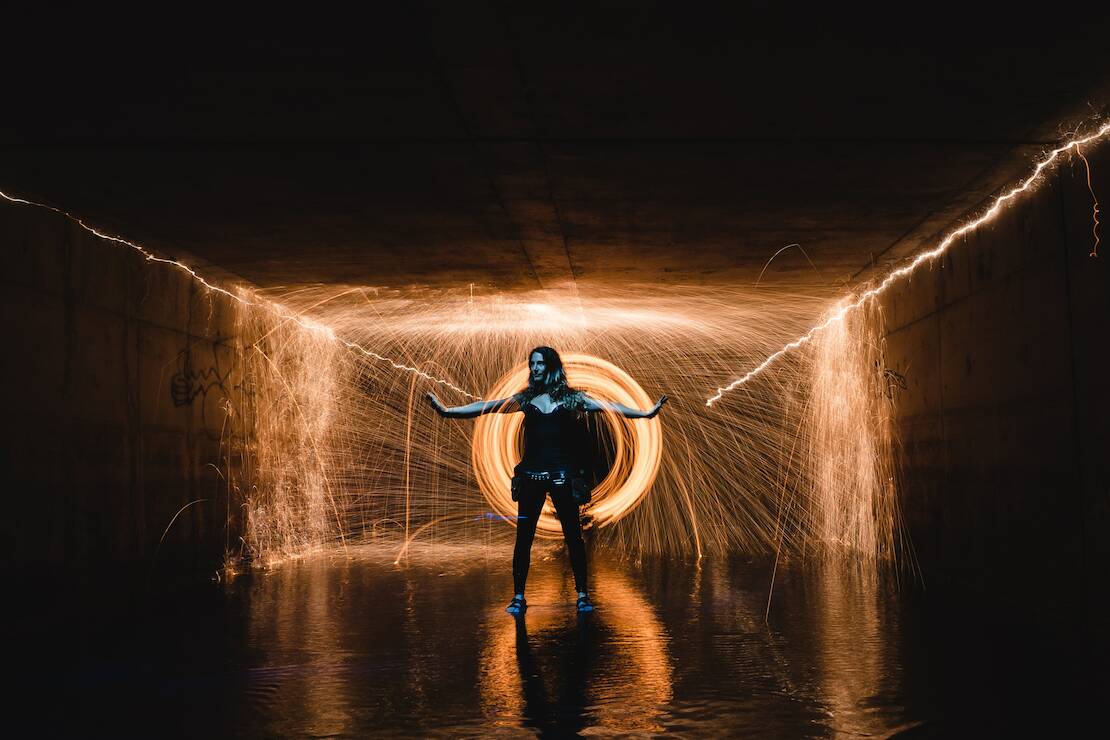
2. Light Painting for Multiple Exposures Using Speedlights
Speedlights make fantastic light painting tools! You can link them up using their auto sync function, and trigger them simultaneously at strategic points within your light painting photo. This creates an image with separate elements that loom out of the background.
One of the best ways to use speedlights in light painting is to create multiple exposures of the same person or object in different parts of the photograph.
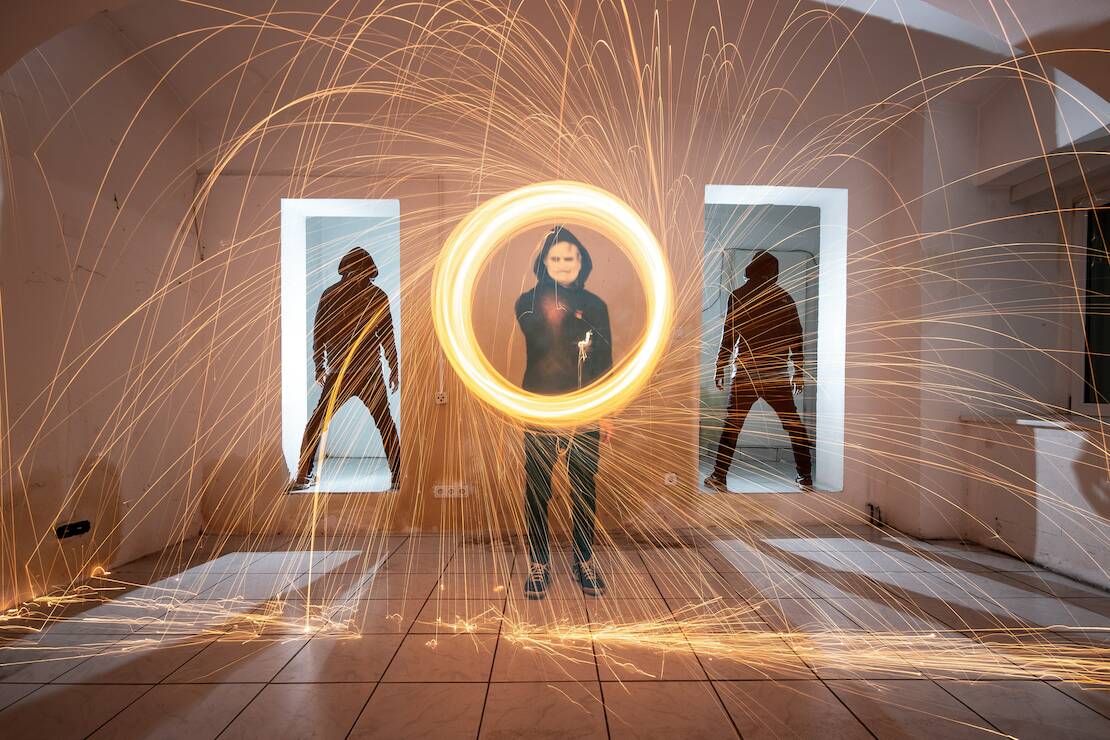
Since the speedlight triggers for a mere fraction of a second to light the subject, but the overall exposure is long, there is plenty of time to reposition your object, and to light it multiple times with your speedlight to tell a dynamic, fragmented story.
This technique works particularly well with people. By lighting the same person multiple times you can create a moving story in your image, or have the person having conversations with themself through time.
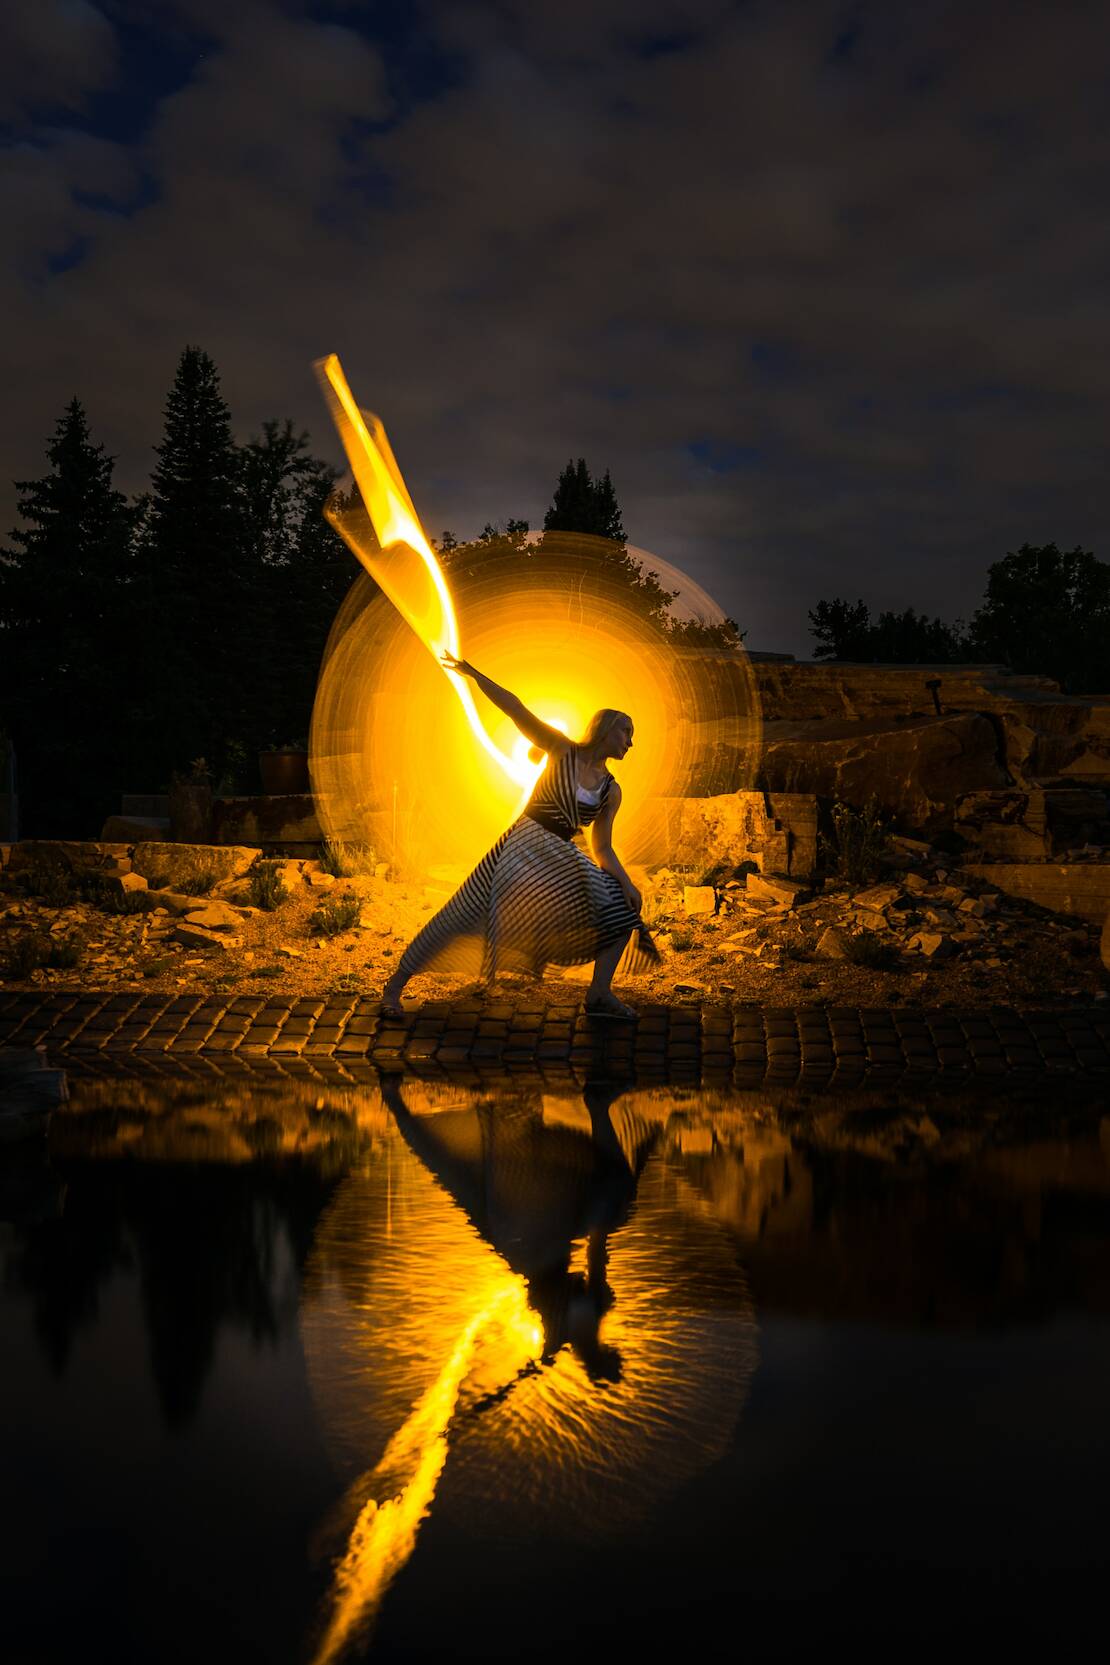
3. Light Painting with Ambient Light in Photography
Low light conditions create brilliant opportunities for light painting, especially if there is an area of the image that catches just a little bit of artificial light in a simple way.
Water and fire are excellent subjects for light painting with ambient light, as they reflect light in multiple directions. Select a scene that's lit by indirect ambient light, such as a waterfall near a lit bridge, or a boat near a jetty. Set up your long exposure for the darkest visible part of the background, and allow the indirect ambient light to brighten some areas of your photo with natural light paint.
Another interesting technique for light painting with ambient light is to light with a stick or to highlight objects from the inside for short periods of time. These images are created by setting up a long exposure for the night sky, and briefly switching on the lamp inside the tent for a few seconds, or swinging a light stick in circles. You can find more about Photographic Lighting here.

4. Drawing with Light
A popular light painting technique in photography is to create line drawings using a thin, narrow beam. Line drawings add an illustrative feel, and can be used to write messages with light or to sharply define the edges of an object.
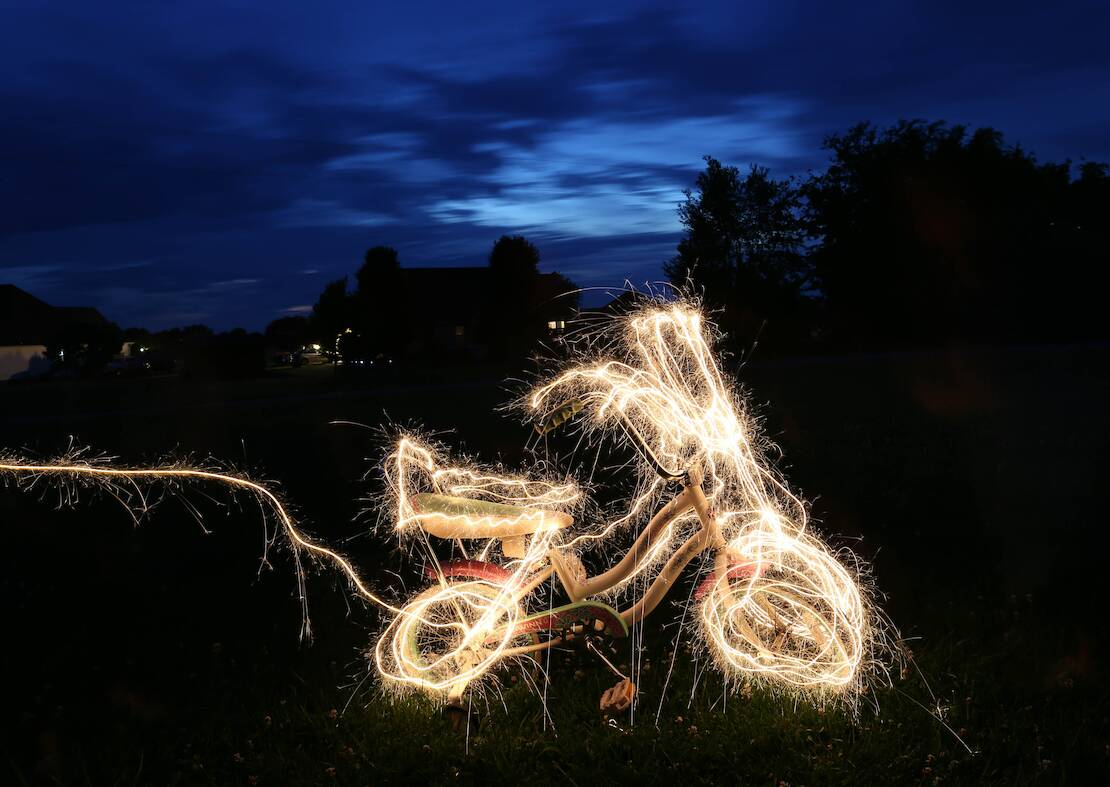
Light drawings are made by exposing for the dark background, then shining a low energy flash light directly at the camera. Move it in the shape you wish to draw. This takes some practice, which is all part of the fun!
You can be extremely creative with this style of light painting. Try playing around with different shapes by moving your arms in giant arches to make circles or fountains in the sky. Sparkle sticks also work very well for this technique, as the glow from the stick lights the face of the person holding it for a gorgeous, serene ambiance.
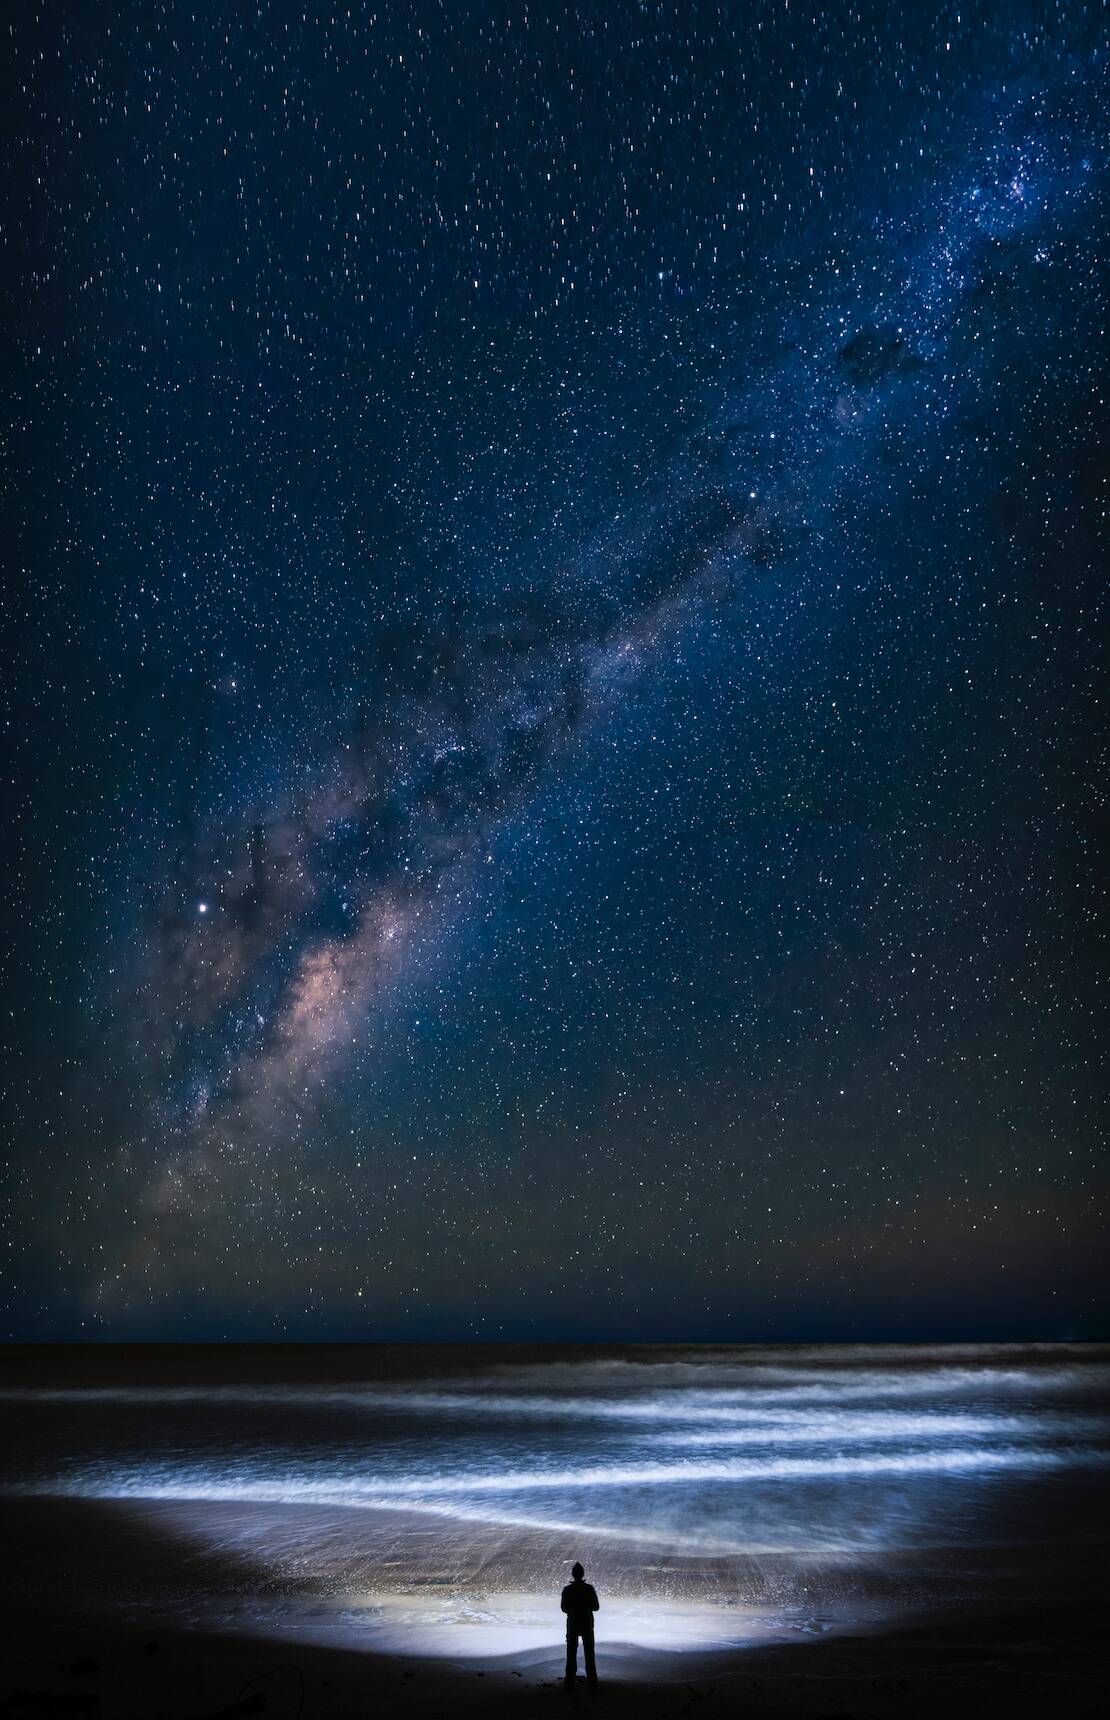
5. Painting with Light Trails in Photography
Stars and the night sky make amazing subjects for light painting. The stars rotate around the earth on a fixed-course trajectory that always follows the same path. When you take a long exposure photo of the night sky, the stars are moving at a different speed to the earth, where you camera is located.

If your exposure is long enough, the stars will move across your image in the time your camera is open. This creates striking lines in the sky. An exposure of 30 minutes or more is enough to create star trails, but the longer your camera remains open, and the wider your aperture, the longer and brighter your star trails will be.
Combine Light Painting Photography Techniques for Best Results
Light painting in photography opens creative freedom, and lets photographers create stories in images that would otherwise not be there.
This combination of traditional art techniques, where the artist decides which objects are put into the art work, and fixed photographic techniques, where the artist frames existing objects, is a rare occasion when the final piece of art reflects both styles of creativity.
The most successful light paintings use a combination of techniques, which creates a similar effect to a mixed media illustration with no rules and zero limitations.
Experiment at different times during dusk, dark, and dawn to get a feel for how the low level ambient light develops and saturates itself over long exposures, then use a variety of lights to add interest to the foreground.
When done well, light paintings are a surreal glimpse of reality. They hint at a world of fantasy that exists within the realms of reality. They take the viewer into another dimension where everything in the photograph is simultaneously impossible, and at the same time, very real.
__________________________________________________________________________________________________________________________
 Natalie Dent is a former professional photographer turned full-time copywriter. She has worked with big brands and small companies to bring the value of storytelling into the customer experience. Natalie is passionate about the relationship between words and images, and how they relate to brands. She holds a degree in visual communication, and a diploma in freelance journalism and travel writing. Her courses in photographic storytelling have been adapted for cruise ship enrichment programs all over the world.
@copywriternatalie